
Peppermint Mini Cheesecakes

Creamy white chocolate and peppermint mini cheesecakes on an Oreo crust — a festive, no-bake treat perfect for holidays and parties.
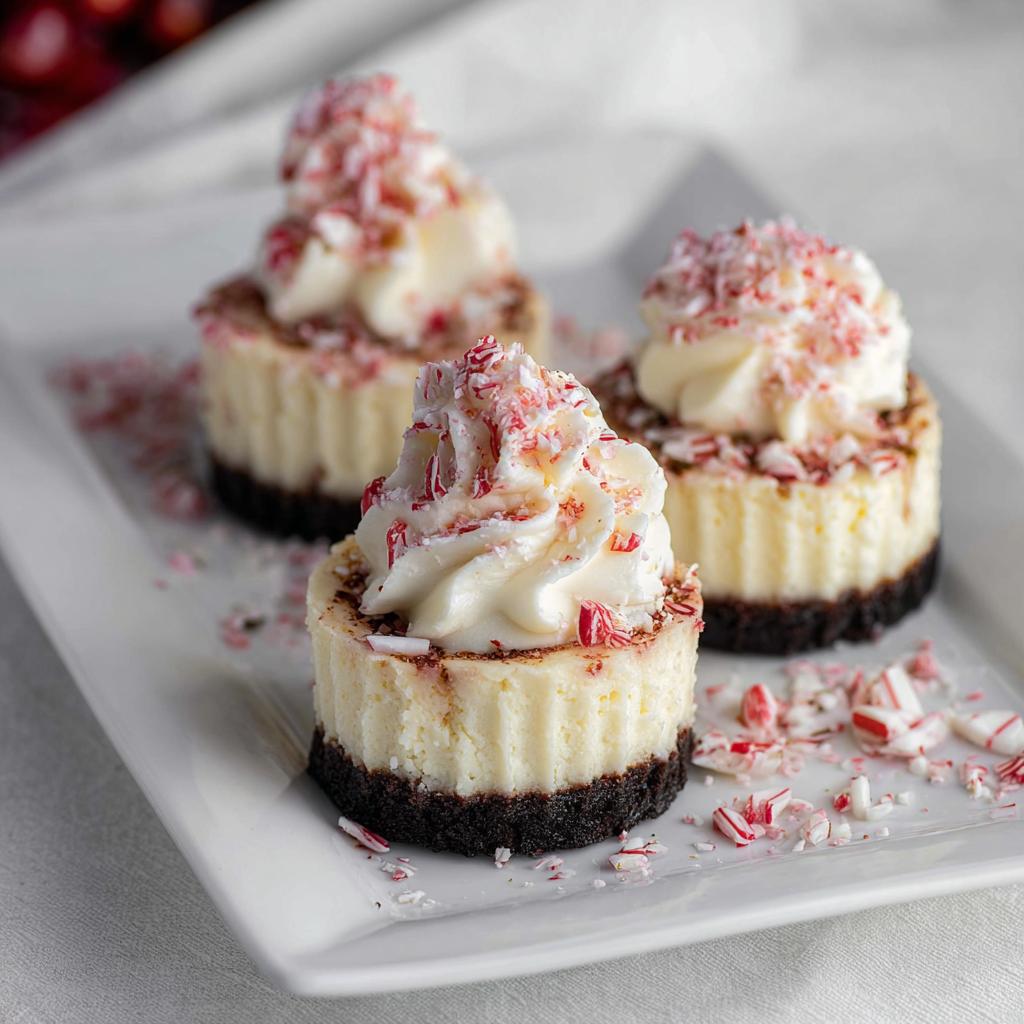
This recipe for peppermint mini cheesecakes has been my holiday go-to for years. I first developed it on a snowy December afternoon when I wanted something festive, portable, and impossibly creamy that would still appeal to kids and adults alike. The bright whisper of peppermint paired with white chocolate creates a cool, velvety filling that contrasts beautifully with a crunchy Oreo base. Every year these little cakes disappear first at parties, and I still remember the delighted surprise on my sister's face when she tasted the first batch.
What makes these particularly special is how effortless they are to assemble despite tasting like a showstopper. They require no baking — just a little melting, whipping, and chilling — and they keep well, which makes them a great choice for entertaining. Texturally, you get a delightfully dense, mousse-like filling that holds its shape in mini cups and a crisp, chocolatey crust with every bite. I love bringing them to gatherings because they travel well and always earn compliments.
Why You'll Love This Recipe
- Made in under an hour of active time with a hands-off chill period, so you can prepare ahead and relax before guests arrive.
- Uses pantry and holiday-staple ingredients like Oreo cookies, white chocolate, and peppermint extract — easy to source even last minute.
- No-bake method eliminates oven timing and keeps your kitchen cool in warm weather or during busy holiday baking sessions.
- Mini portions are perfect for parties and portion control; they’re also freezer-friendly for make-ahead dessert trays.
- Crowd-pleasing flavor: sweet white chocolate balances a crisp peppermint crunch for broad appeal across ages.
- Simple swaps make it allergy-adaptable and versatile for dietary tweaks.
In my experience, guests always comment on the contrast between the silky filling and the crunchy topping. The chopped Andes peppermint pieces provide a pleasant textural surprise, and it’s one of the few desserts that both chocolate lovers and mint fans ask me to bring again.
Ingredients
- Crust: 20 Oreo cookies and 5 tablespoons unsalted butter, melted. Choose classic Oreos for deep chocolate flavor; remove the filling if you prefer a drier crust, but keeping the filling adds sweetness and helps the crumbs bind.
- Filling: 1 cup cold heavy whipping cream, 16 ounces cream cheese softened (two 8-ounce packages). Use full-fat cream cheese for structure and taste; brands like Philadelphia give a reliably smooth result.
- White chocolate: 1 1/2 cups white chocolate chips. Quality matters here — Ghirardelli or Callebaut-style chips melt cleanly and lend a rich, vanilla-sweet backbone to the mint.
- Peppermint extract: 1/2 teaspoon. Start here and add cautiously; peppermint extract is potent and can quickly dominate.
- Andes Peppermint Crunch: 1/2 cup chopped, plus extra for garnish. The finely chopped peppermint candy delivers that signature crunchy contrast; if you prefer a milder crunch, reduce to 1/4 cup.
- Topping: Whipped cream for garnish and additional chopped peppermint for color and texture. Store-bought or freshly whipped both work; freshly whipped adds silkiness and a hint of sweetness without stabilizers.
Instructions
Prepare the crust:Line a 12-cup muffin tin with paper liners or use a silicone mini muffin pan for easy removal. Place 20 Oreo cookies in a food processor and pulse to fine crumbs, or place in a sealed bag and crush with a rolling pin. Combine crumbs with 5 tablespoons melted butter until evenly moistened. Press about 1 to 1 1/2 tablespoons of the crumb mixture into the bottom of each liner, compacting firmly with the back of a spoon or a small measuring cup. Chill in the refrigerator while you make the filling to help the crust set, about 10 minutes.Melt the white chocolate:Place 1 1/2 cups white chocolate chips in a heatproof bowl and warm gently over a small saucepan of simmering water (double boiler) or microwave in 20-second bursts, stirring between, until smooth. Keep the chocolate warm but not hot; if it overheats it can seize. A temperature of roughly 100 to 105°F is ideal. Stir in 1/2 teaspoon peppermint extract once melted for even distribution.Beat the cream cheese base:Using a stand mixer fitted with the paddle attachment or a hand mixer, beat the softened cream cheese (two 8-ounce packages) on medium speed until completely smooth and free of lumps, about 2 to 3 minutes. Scrape down the bowl to ensure even texture. With the mixer on low, pour in the warm white chocolate in a thin stream and continue mixing until incorporated and silky. Allow the mixture to cool slightly if the white chocolate warmed the blend.Whip the cream and fold:In a chilled bowl, whip 1 cup of cold heavy whipping cream to soft peaks. Gently fold about one-third of the whipped cream into the cream cheese and white chocolate mixture to loosen it, then fold in the remaining cream until evenly combined and light. Fold in 1/2 cup chopped Andes Peppermint Crunch for texture. Avoid overmixing to keep the filling airy.Fill and chill:Divide the filling evenly among the prepared crusts, filling each almost to the top. Smooth the tops with an offset spatula or the back of a spoon. Refrigerate until set, at least 3 to 4 hours, or overnight for best slicing and firmness. For faster firming, briefly freeze for 45 to 60 minutes then transfer to the refrigerator.Garnish and serve:Top each mini cake with a dollop of whipped cream and a sprinkle of extra chopped Andes Peppermint Crunch just before serving. If you refrigerated for longer than a day, allow cakes to sit at room temperature for 10 minutes to soften slightly for best texture.
You Must Know
- These keep refrigerated for up to 4 days in an airtight container and freeze well for up to 3 months; thaw overnight in the fridge before serving.
- High in calcium and rich in fat due to cream cheese and heavy cream; plan portion sizes accordingly.
- No-bake method reduces oven time and is excellent for busy holidays or warm kitchens.
- For firmer slices, chill overnight; for a softer, mousse-like bite, serve after 3 hours of chilling.
My favorite part is the ritual of chopping the Andes pieces while holiday music plays — it feels like the final flourish. Guests often reach for seconds because the small size invites indulgence without overdoing it, and I’ve even seen them become a requested contribution at office parties and cookie exchanges.

Storage Tips
Store in a single layer in an airtight container in the refrigerator for up to 4 days. If stacking is necessary, separate layers with parchment paper to protect the whipped topping and garnish. For longer storage, freeze fully set cakes on a baking sheet until solid, then transfer to a freezer-safe container with parchment between layers; freeze up to 3 months. Thaw in the refrigerator overnight and add fresh whipped cream before serving to revive the presentation.
Ingredient Substitutions
If you need gluten-free options, use gluten-free chocolate sandwich cookies for the crust and verify your white chocolate chips are labeled gluten-free. For a dairy-free adaptation, substitute dairy-free cream cheese and coconut whipping cream; note the flavor will shift and texture may be softer. If Andes candies are unavailable, finely chop peppermint Bark or use crushed candy canes for a cleaner mint flavor; reduce quantity slightly to avoid over-crunching.
Serving Suggestions
Serve these as part of a dessert platter with dark chocolate truffles and salted caramel bites for contrast. They shine after a cozy holiday meal alongside mulled wine or peppermint hot chocolate. Garnish with a small sprig of fresh mint for color, or place a single mini candy on top for a nostalgic look. For a party tray, arrange alternating peppermint and chocolate mini cakes for visual variety.
Cultural Background
Mint and chocolate pairings are a modern holiday favorite in American baking, inspired by classic European mint-chocolate confections. Andes mints, introduced in the 1950s in the United States, became synonymous with peppermint-chocolate desserts. These mini no-bake cakes combine that festive flavor pairing with American-style individual portions, reflecting the current trend toward shareable, bite-sized holiday treats.
Seasonal Adaptations
In summer, swap peppermint extract for orange or lemon zest and use chopped white chocolate with citrus candies for a lighter profile. For winter holidays, increase the peppermint slightly and add a drizzle of dark chocolate on top for a decadent finish. You can also fold in a tablespoon of espresso powder into the white chocolate for an adult variation that plays up the sweetness with a bitter edge.
Meal Prep Tips
Assemble the crusts and store them covered in the refrigerator a day ahead. Prepare the white chocolate mixture and whipped cream separately and combine on the day you plan to serve for the freshest texture. If making a large batch, work in 2–3 batches when folding in whipped cream to maintain an even airy texture. Label containers with dates when freezing to keep track of freshness.
These little peppermint cheesecakes are a reliable crowd-pleaser that bring cheer to any gathering; I hope they become a favorite for your holiday table as they have for mine.
Pro Tips
Soften cream cheese to room temperature for at least 30 minutes to avoid lumps and ensure a silky filling.
Warm white chocolate slowly and avoid direct high heat to prevent seizing; if it thickens, add a teaspoon of neutral oil to smooth it.
Chill crusts before filling to prevent the butter from softening and the filling from sinking.
Use an ice cream scoop for even portioning of the filling and consistent mini cakes every time.
This nourishing peppermint mini cheesecakes recipe is sure to be a staple in your kitchen. Enjoy every moist, high protein slice — it is perfect for breakfast or as a wholesome snack any time.
Tags
Peppermint Mini Cheesecakes
This Peppermint Mini Cheesecakes recipe makes perfectly juicy, tender, and flavorful steak every time! Serve with potatoes and a side salad for an unforgettable dinner in under 30 minutes.
Ingredients
Crust
Filling
Instructions
Prepare the crust
Crush 20 Oreo cookies to fine crumbs and mix with 5 tablespoons melted butter. Press 1 to 1 1/2 tablespoons into each of 12 liners and chill 10 minutes to set.
Melt white chocolate
Melt 1 1/2 cups white chocolate chips in a heatproof bowl over simmering water or in short microwave bursts until smooth, then stir in 1/2 teaspoon peppermint extract.
Beat cream cheese and combine
Beat two 8-ounce packages of softened cream cheese until smooth, stream in melted white chocolate while mixing, then cool slightly before folding in whipped cream.
Whip cream and fold
Whip 1 cup cold heavy whipping cream to soft peaks. Fold one-third into the cream cheese mixture to loosen, then fold in remaining cream and 1/2 cup chopped Andes Peppermint Crunch.
Fill and chill
Divide filling among crusts, smooth tops, and refrigerate 3 to 4 hours or overnight until set. Garnish with whipped cream and extra peppermint before serving.
Last Step: Please leave a rating and comment letting us know how you liked this recipe! This helps our business to thrive and continue providing free, high-quality recipes for you.
Nutrition
Did You Make This?
Leave a comment & rating below or tag
@moodcooks on social media!
Categories:
You might also like...
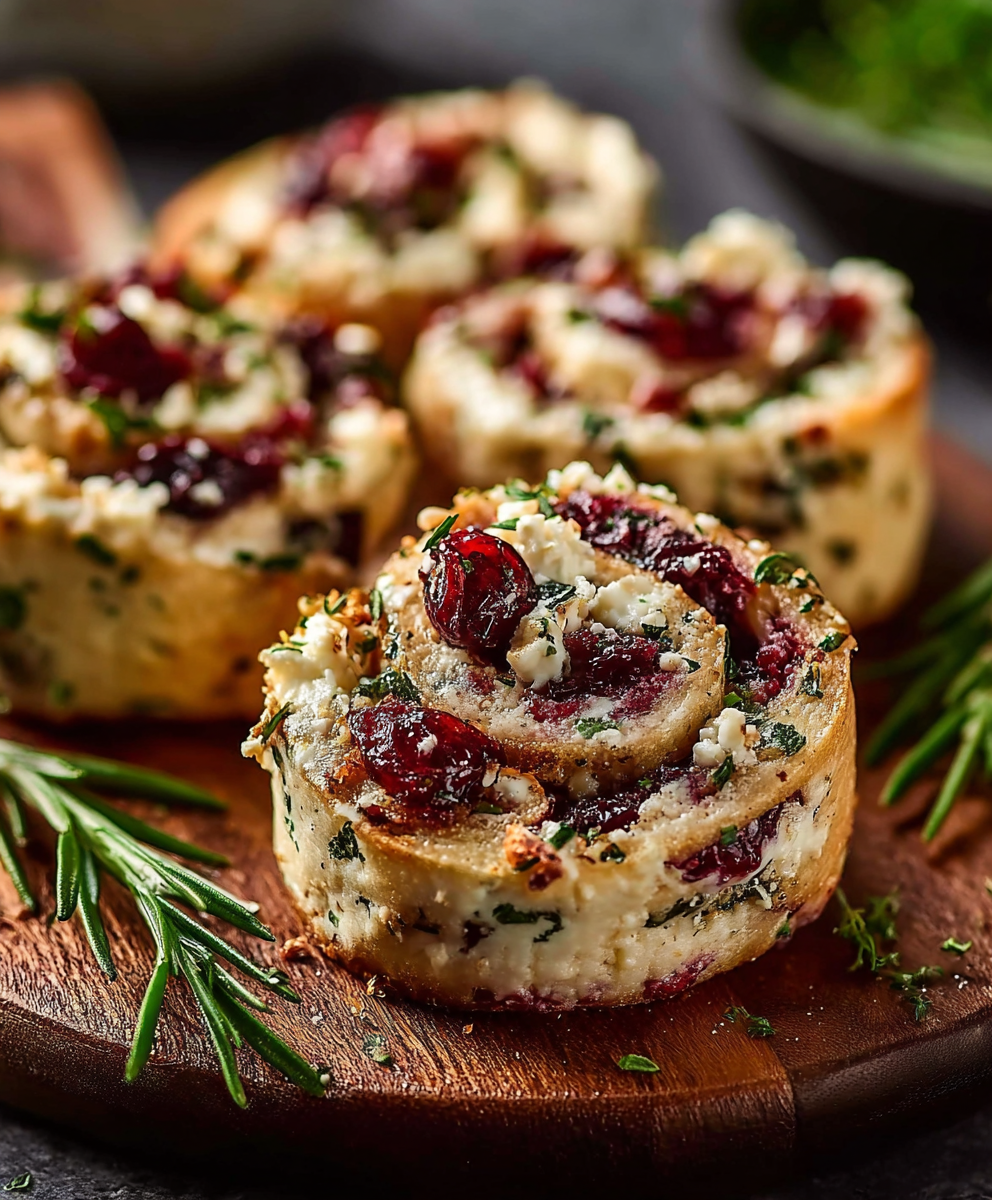
Cranberry Cream Cheese Pinwheels with Feta & Herbs
Buttery puff pastry rolled with tangy cream cheese, bright cranberries, salty feta and fresh herbs — effortless, elegant pinwheels perfect for gatherings or a cozy snack.

Artisan Pizza Dough — Crispy, Chewy, Bubbly Crust
A simple, reliable dough that produces a crispy exterior, chewy interior and those coveted bubbly pockets — perfect for home ovens or a pizza stone.

Italian Chicken Saltimbocca
Tender chicken breasts wrapped in prosciutto and sage, pan-seared and finished in a bright wine-and-broth sauce — a quick, elegant weeknight favorite.
Did You Make This?
Leave a comment & rating below or tag @moodcooks on social media!
Rate This Recipe
Share This Recipe
Enjoyed this recipe? Share it with friends and family, and don't forget to leave a review!
Comments (1)
This recipe looks amazing! Can't wait to try it.
Comments are stored locally in your browser. Server comments are displayed alongside your local comments.

Hi, I'm Olivia!
What's Popular

30-Minute Meals!
Join to receive our email series which contains a round-up of some of our quick and easy family favorite recipes.