>>
30-MINUTE MEALS! Get the email series now →


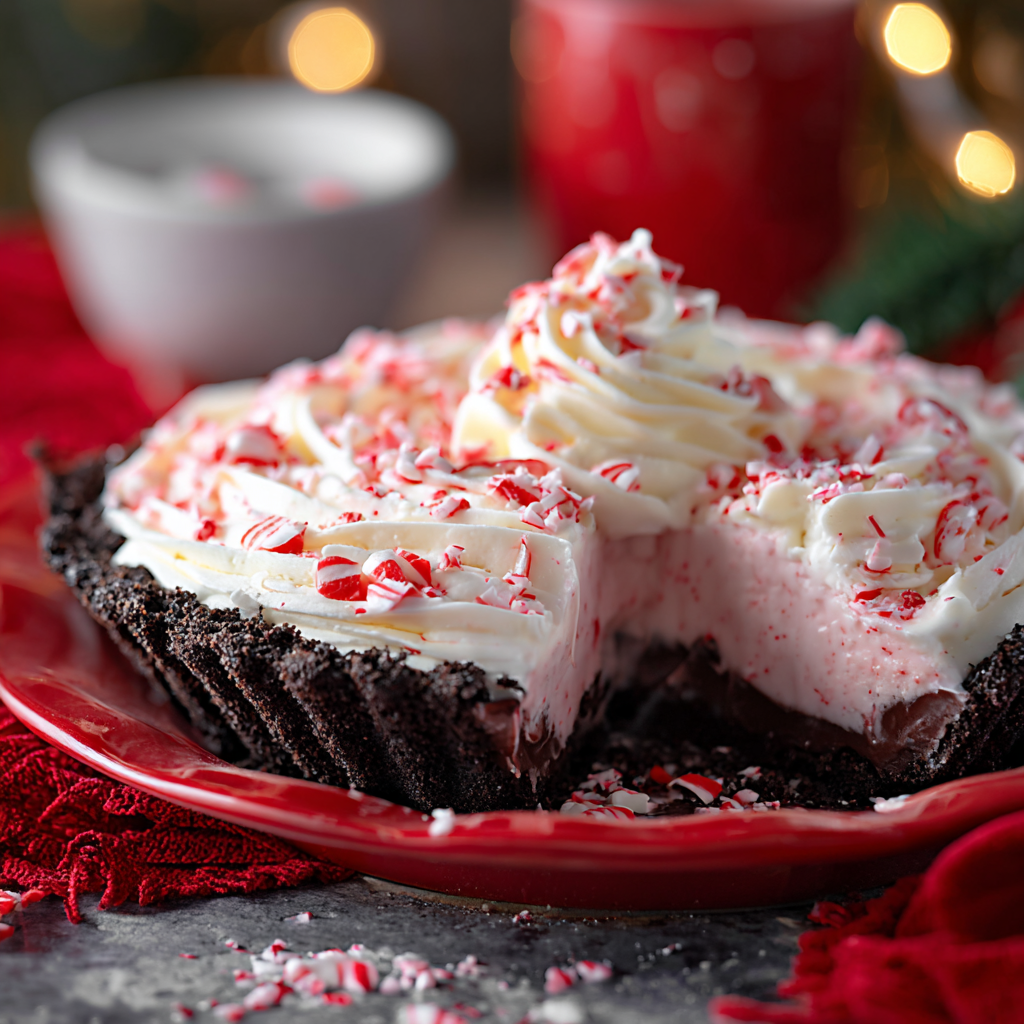
A festive, creamy peppermint pie layered in an Oreo crust, flavored with pure vanilla and peppermint, topped with whipped cream and extra candy for a showstopping holiday dessert.

This No Bake Christmas Peppermint Pie has been my go to holiday dessert for years. I first put this together on a busy December afternoon when I wanted something festive without turning on the oven. The creamy, tangy cream cheese base paired with bright peppermint and a crunchy Oreo crust created a texture contrast that instantly became a signature for family gatherings. It sets quickly in the refrigerator and slices cleanly, making it perfect for potlucks and last minute guests.
The combination of pure vanilla, peppermint flavoring, and crushed peppermint candy gives the filling a balanced sweetness with a cooling finish that feels holiday appropriate without being cloying. I use McCormick pure vanilla extract for a clean backbone and always let the cream cheese come to room temperature for a lusciously smooth filling. Every spoonful delivers a silky mouthfeel with specks of crushed candy for a tiny crunch. Over the years this recipe has been requested for cookie exchanges, holiday dinners, and casual coffee visits, and it never fails to impress.
I still remember serving this on our first holiday with a new puppy underfoot. Neighbors and family kept coming back for slices and the pie disappeared faster than the cookies. My sister told me the texture reminded her of a peppermint cheesecake without the fuss, which is exactly the kind of feedback that made me make this every year.

One of my favorite things about this pie is the way the peppermint candy flecks catch the light and the way guests comment on how it tastes like a grown up peppermint candy combined with a very light mousse. We often serve a thin slice after a heavy holiday meal and it refreshes the palate without feeling heavy.
Store the pie in the refrigerator covered with plastic wrap or in a pie keeper to avoid absorbing other odors. It will keep for up to 4 days and still retain texture. If you need longer storage, freeze the whole pie tightly wrapped in plastic and then foil for up to 3 months. Thaw overnight in the refrigerator. If the whipped topping loses volume after freezing, refresh with a light layer of thawed whipped topping before serving. Use a thin film of plastic wrap pressed to the surface to keep the garnish intact when storing in the fridge for a day or two.
If you prefer a lighter filling, use Neufchâtel cheese in place of full fat cream cheese though the filling will be slightly less firm. For a gluten free option choose a 9 inch gluten free chocolate cookie crust and gluten free peppermint candy. If you cannot find peppermint extract, replace with 1 1/2 teaspoons of crushed candy canes dissolved in the powdered sugar, but this may add a touch more sweetness. For a dairy free variation, substitute dairy free cream cheese alternatives and a stabilized coconut cream in place of whipped cream, though texture and flavor will shift toward coconut.
Serve slices chilled alongside simple accompaniments like espresso, black tea, or a small scoop of vanilla ice cream. Garnish each slice with a mini candy cane and a drizzle of dark chocolate for contrast. For an adult party, pair with a mint liqueur or coffee liqueur after dinner. Present the pie on a white platter to make the pink tint and crushed peppermint pop. Small mint sprigs or edible silver stars add a festive finishing touch for holiday tables.
The idea of combining peppermint with cream based desserts is rooted in classic holiday confection traditions where mint balances the richness of dairy. While this specific combination is modern and American in origin, it echoes European flavors where mint and chocolate are often paired. Ready made cookie crusts became popular in the mid 20th century and made chilled, set desserts much more accessible to home cooks, inspiring countless no bake creations that allow seasonal flavors like peppermint to shine without complex techniques.
Change the flavor profile for different seasons. Swap peppermint for orange extract and crushed candied orange peel for winter to spring transitions, or use cinnamon and finely chopped gingersnaps in the crust for a cozy autumn twist. For Valentine inspired dessert, double the red food color and add dark chocolate shavings. In warmer months, reduce the peppermint to half a teaspoon and serve smaller slices with fresh berries for a lighter finish.
Make the filling up to 24 hours ahead and store in the refrigerator in a covered bowl. Pour into the crust and chill to set the morning of your event to save time. Use shallow airtight containers for leftover slices to speed chilling and maintain structure. For transport, place the pie on a non slip mat in a cooler bag with ice packs to keep it firmly chilled on the way to potlucks or parties.
This pie is one of those easy, festive recipes that invites personalization. Try the suggestions, make it your own, and enjoy the ease of a show stopping dessert without turning on the oven. Happy holidays and happy baking, or in this case happy chilling.
Always use room temperature cream cheese and beat well for a silky filling.
Chill mixing bowls for whipping cream to speed whipping and achieve soft peaks.
Fold whipped cream in three additions to preserve volume and avoid deflating the filling.
Use gel food color for a richer hue without changing the consistency.
Slice with a knife dipped in hot water and wiped dry for clean slices.
This nourishing no bake christmas peppermint pie recipe is sure to be a staple in your kitchen. Enjoy every moist, high protein slice — it is perfect for breakfast or as a wholesome snack any time.
Yes. You can prepare the filling and refrigerate it covered for up to 24 hours before pouring into the crust. The assembled pie should be chilled at least 2 hours before serving.
For smoother results, bring cream cheese to room temperature and beat thoroughly. If small lumps remain, press the mixture through a fine mesh sieve or continue beating until smooth.
Freeze the pie wrapped tightly for up to 3 months. Thaw overnight in the refrigerator and refresh the topping if needed.
This No Bake Christmas Peppermint Pie recipe makes perfectly juicy, tender, and flavorful steak every time! Serve with potatoes and a side salad for an unforgettable dinner in under 30 minutes.
Remove cream cheese from the refrigerator to soften and chill bowls for whipping. Measure dry ingredients and have the 9 inch Oreo crust ready.
Beat softened cream cheese until smooth, add powdered sugar and vanilla, and beat until fully combined for a silky base.
Stir in peppermint extract, add red food color drop by drop to reach a soft pink, and fold in crushed peppermint candy.
Whip 1 cup heavy cream to soft peaks in a chilled bowl, watching closely to avoid over whipping.
Fold whipped cream gently into the cream cheese mixture in three additions, then spoon into the Oreo crust and smooth the top.
Cover and refrigerate for at least 2 hours or up to overnight so the filling sets and slices cleanly.
Spread thawed whipped topping over the chilled pie, sprinkle extra crushed peppermint, and serve chilled.
Last Step: Please leave a rating and comment letting us know how you liked this recipe! This helps our business to thrive and continue providing free, high-quality recipes for you.
Leave a comment & rating below or tag
@moodcooks on social media!
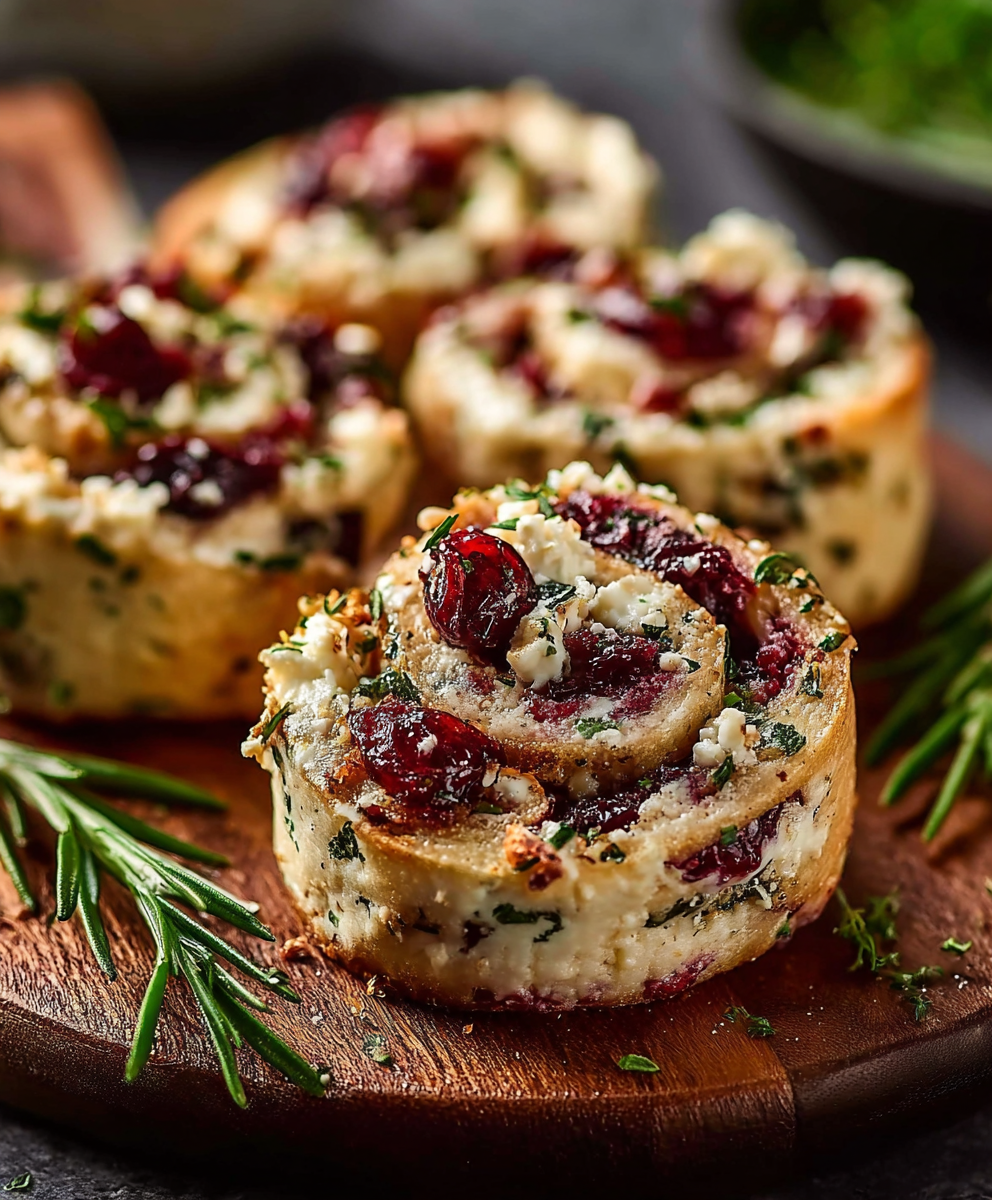
Buttery puff pastry rolled with tangy cream cheese, bright cranberries, salty feta and fresh herbs — effortless, elegant pinwheels perfect for gatherings or a cozy snack.

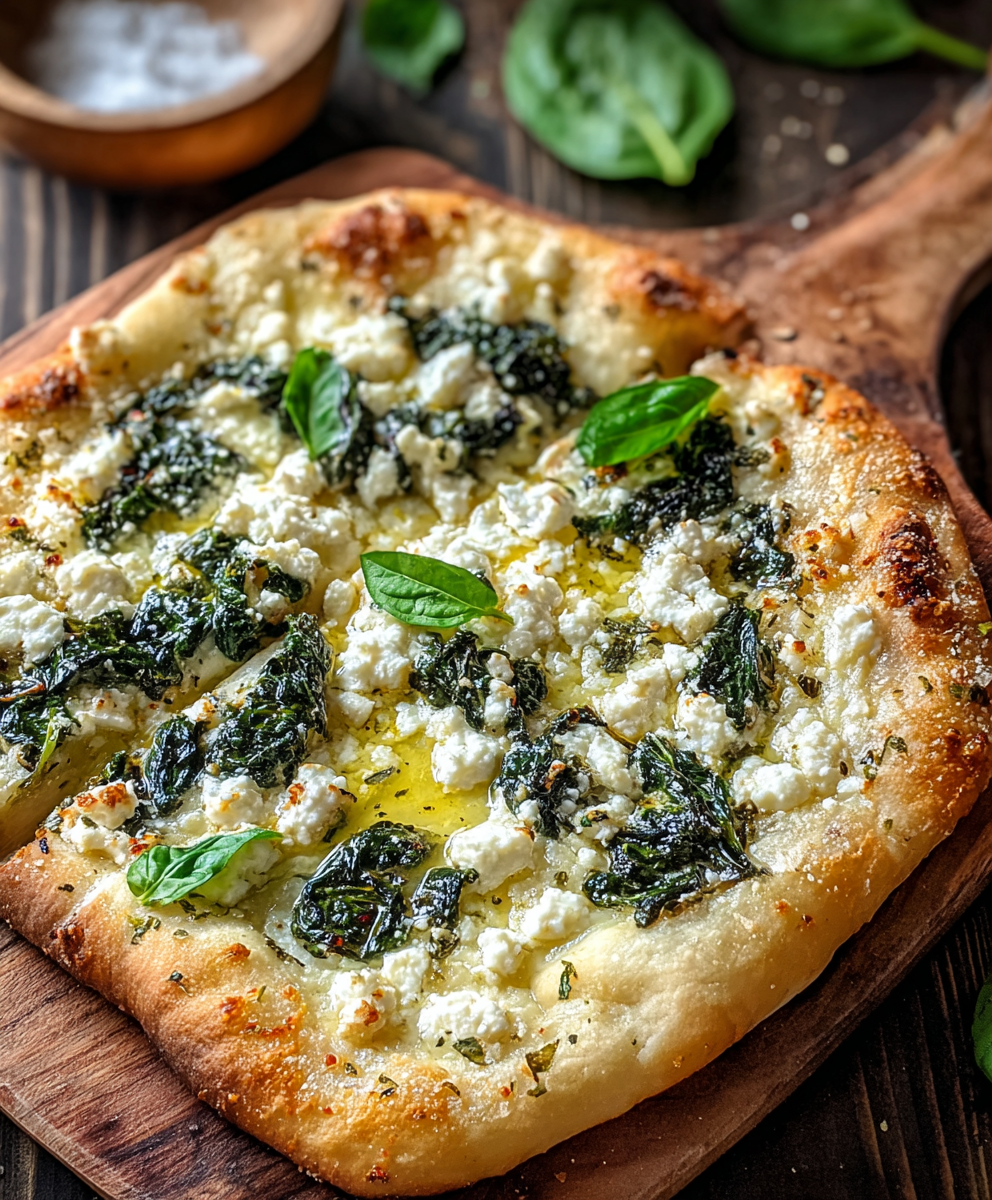
A simple, reliable dough that produces a crispy exterior, chewy interior and those coveted bubbly pockets — perfect for home ovens or a pizza stone.

Tender chicken breasts wrapped in prosciutto and sage, pan-seared and finished in a bright wine-and-broth sauce — a quick, elegant weeknight favorite.
Leave a comment & rating below or tag @moodcooks on social media!
Enjoyed this recipe? Share it with friends and family, and don't forget to leave a review!
This recipe looks amazing! Can't wait to try it.
Comments are stored locally in your browser. Server comments are displayed alongside your local comments.

Join to receive our email series which contains a round-up of some of our quick and easy family favorite recipes.