
Homemade Mint Candies

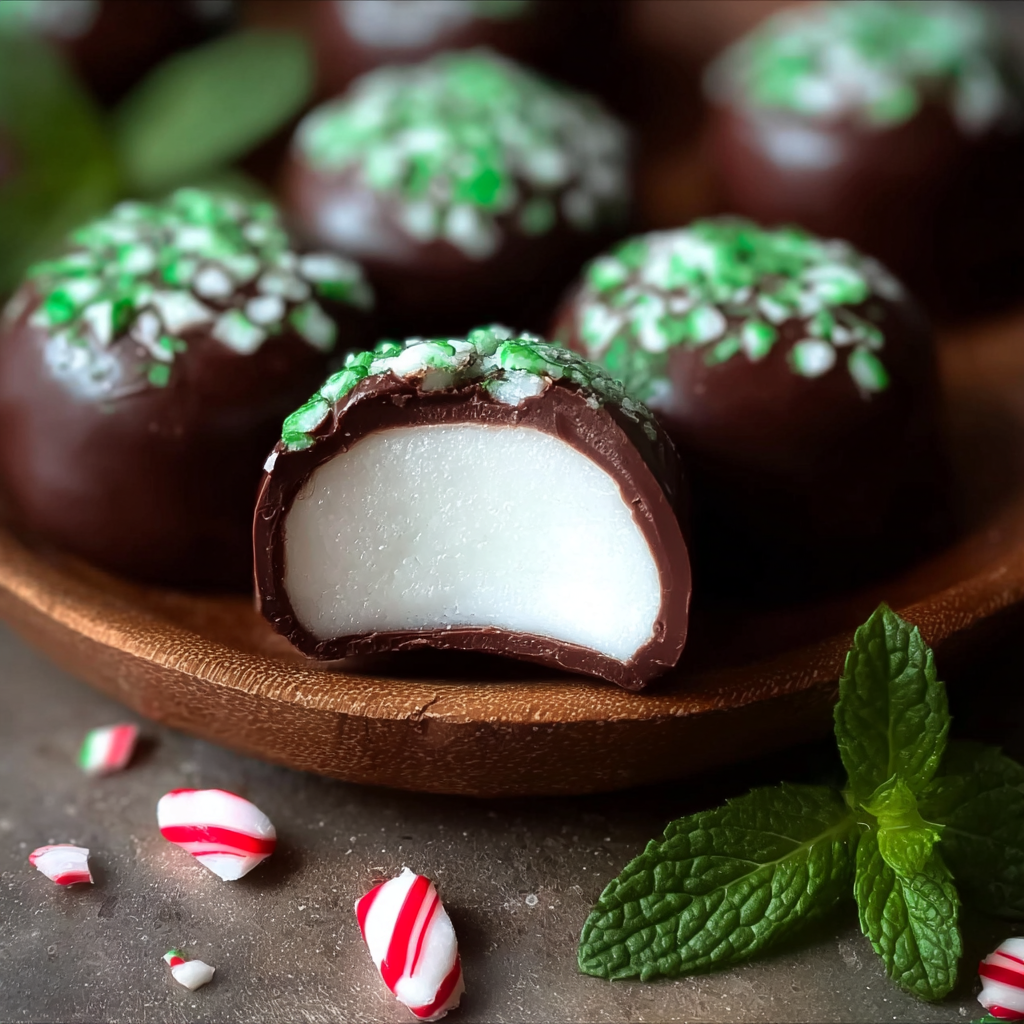
Silky peppermint centers coated in dark chocolate make these homemade mint candies an irresistible holiday treat that is quick to prepare and perfect for sharing.

This recipe for homemade mint candies became a ritual in my kitchen the moment I tasted the first batch. I discovered this little confection on a rainy afternoon when I had a craving for the cooling freshness of peppermint and a small stash of sweetened condensed milk in the pantry. The result surprised me with a smooth, almost fondant like center that melts on the tongue and a crisp dark chocolate shell that snaps softly with every bite. It is deceptively simple but feels indulgent which is why I reach for it when I want an elegant homemade gift or a small sweet to serve after dinner.
What makes these candies special is the balance between the candy center and the chocolate coating. The center is tender yet holds its shape, bright with peppermint and rounded by a whisper of vanilla. Working with the dough is forgiving and satisfying. My family remembers the first time I made a tray of these and placed them on a paper doily for guests. They disappeared in under an hour and multiple friends asked for the recipe right away. I love that even the pickiest peppermint fan will enjoy these because the mint is clear but not overpowering.
Why You'll Love This Recipe
- The center comes together in minutes using pantry staples and requires no special candy thermometer or stovetop boiling. The total active time is under 30 minutes and with chill time the whole process completes in about one hour.
- It uses sweetened condensed milk to create a luxuriously soft texture without fuss. Powdered sugar gives structure so the candies are not sticky and hold a clean shape when cut.
- The coating with dark melting chocolate offers a professional finish and deep flavor contrast that lifts the peppermint. You can dip them by hand so no special equipment is required beyond basic kitchen tools.
- This method is naturally ready for make ahead. You can form and freeze the centers then dip them later in a single session which is ideal for holiday preparation or party planning.
- The recipe is flexible. Use peppermint oil or extract to adjust strength and choose decorations from sprinkles to a dusting of cocoa powder for a bespoke look.
I have given these to neighbors wrapped in parchment and tied with twine. Every time someone bites into one they close their eyes and smile. Making them became a winter Sunday tradition in my home because they are small, shareable and carry seasonal cheer without a lot of fuss.
Ingredients
- Sweetened condensed milk 3 4 cup: This is the backbone of the candy. Choose a full fat brand for the creamiest texture. I prefer a well known US brand for consistency. The sugars and milk solids create a tender, slightly chewy center.
- Peppermint extract 1 1 4 teaspoons: Pure peppermint extract gives a clean cool flavor. If you like a very strong mint taste use a good quality extract and adjust upward carefully because the flavor can become sharp.
- Vanilla extract 1 8 teaspoon: A tiny amount of vanilla rounds the mint and keeps the center from tasting one dimensional. Use pure vanilla extract for best aroma.
- Powdered sugar 4 cups plus extra for sprinkling: This provides structure and a smooth mouthfeel. I sift the powdered sugar before use to avoid lumps. Reserve a few tablespoons to dust the work surface so the dough does not stick.
- Dark melting or dipping chocolate 2 cups: Choose a couverture style or a high quality melting chocolate for a glossy finish. Dark chocolate at 55 70 percent cacao pairs beautifully with peppermint and offsets the sweetness of the center.
- Sprinkles optional: Use decorative sprinkles that are certified gluten free if needed. Keep them minimal so the chocolate shell remains the star.
Instructions
Make the mint doughIn the bowl of a stand mixer fitted with the paddle attachment combine the sweetened condensed milk with the peppermint extract and the vanilla extract. Start the mixer on low and add about half of the powdered sugar slowly. Allow the sugar to incorporate before adding the remainder a little at a time until the mixture forms a cohesive dough that pulls away from the bowl. The texture should be smooth and not crumbly. If it feels too sticky add powdered sugar one tablespoon at a time until manageable.Chill and shapeLightly dust a piece of parchment with about three tablespoons of powdered sugar. Turn the dough out and knead briefly on the parchment to incorporate any loose sugar. Press and roll the dough into a disk about 1 2 inch thick. Dust the top with powdered sugar to prevent sticking to the rolling pin. If the dough becomes warm from handling refrigerate for 10 minutes so it firms slightly which makes cutting cleaner.Cut circles and freezeUse a 1 to 1 1 2 inch cookie cutter or the mouth of a small glass to stamp circles from the dough. Re roll scraps once more and stamp until all dough is used. Place the circles on a parchment lined baking sheet in a single layer and freeze for 15 minutes to help them hold shape when dipped.Melt the chocolatePlace the chocolate in a microwave safe bowl and heat in 30 second increments stirring between each interval to prevent scorching. When most of the chocolate has melted remove from the microwave and stir until fully smooth. Allow the chocolate to cool for 3 to 4 minutes but not so long that it begins to seize. Ideal dipping temperature for dark chocolate is warm enough to coat easily yet cool enough to keep the peppermint from softening.Dip and finishUsing a fork pick up a frozen center and lower it into the melted chocolate. Turn it to coat both sides then lift, tap off excess and set back on the parchment. Add sprinkles immediately if using so they adhere to the wet chocolate. Continue until all pieces are coated then refrigerate for about 20 minutes to set the chocolate.
You Must Know
- These keep well in the refrigerator for up to two weeks when stored in a single layer or separated by parchment. They also freeze well for up to three months if wrapped airtight.
- The recipe is high in sugar and contains dairy. Each piece has roughly 190 calories depending on the size and thickness of the chocolate coating.
- If the chocolate thickens while dipping warm it can be refreshed with a gentle five second burst in the microwave and a prompt stir.
- Work quickly when rolling and cutting so the centers do not become too soft from handling. Chilling for 10 to 15 minutes makes cutting easier and cleaner.
What I enjoy most about this method is how forgiving it feels. Over the years I have taught friends to make these and even first timers find success. My partner always announces when a batch is ready and places them on the coffee table for a mid afternoon treat. It is a small thing that becomes a shared moment and that is why I keep making them season after season.
Storage Tips
Store the candies in an airtight container layered with parchment paper to avoid sticking. Keep them in the refrigerator if you plan to enjoy them within two weeks. For longer storage place them in a freezer safe container separated by parchment and freeze for up to three months. To thaw, transfer to the refrigerator for a few hours and bring to room temperature before serving to preserve snap in the chocolate shell. Avoid direct sunlight and humid spots which can cause the chocolate to bloom and lose gloss.
Ingredient Substitutions
If you do not have condensed milk try making a quick substitute with evaporated milk and sugar but note the texture will differ slightly. For a stronger mint profile use peppermint oil very sparingly as it is more concentrated than extract one drop at a time. Swap the dark chocolate for milk chocolate for a sweeter finish or use white chocolate if you prefer a confection that looks festive when tinted. For a dairy free version choose a coconut based condensed milk alternative and dairy free melting wafers, though texture and flavor will change.
Serving Suggestions
Serve these after a heavy meal as a light palate cleanser or arrange them on a small tray with coffee and tea. They make elegant edible gifts when wrapped in small cellophane bags tied with ribbon. Pair the candies with shortbread or biscotti for a dessert plate or include them as part of a holiday cookie box. Garnish with a tiny strip of zest or a single sugar crystal for a refined presentation.
Cultural Background
Mint flavored confections appear across many traditions as a refreshing finish to rich meals. The method here borrows from classic fondant style centers coated in chocolate, a technique popular in European candy making. Over time home cooks in many regions adapted these concepts using available pantry ingredients which is how sweetened condensed milk became a convenient shortcut for a smooth sweet center in modern home kitchens.
Seasonal Adaptations
In winter add a touch of crushed candy cane to the top for a festive crunch. For summer gifting keep the chocolate glossy by storing in a cool place and choosing a higher cacao content chocolate which is less prone to softening. To make them for Valentine season shape the centers into small hearts using a tiny cutter and dip in pink tinted white chocolate for a themed variation.
Meal Prep Tips
Make the centers ahead and freeze them layered in parchment for up to three months. When ready to finish melt the chocolate and dip as many as you like in a single session. This approach saves time and lets you create multiple batches to gift or serve over several weeks. Label containers with date and flavor notes so you can rotate through different flavored fillings like orange or coffee infused variants.
These candies invite creativity and sharing. Whether you keep them all or give most away you will enjoy the ritual of making something thoughtful by hand.
Pro Tips
Dust your work surface and rolling pin lightly with powdered sugar to prevent sticking.
Freeze the centers for 15 minutes before dipping so they hold their shape and minimize melting.
Heat the chocolate in short bursts and stir between each interval to avoid scorching.
If chocolate thickens during dipping refresh with a brief microwave stir and use immediately.
This nourishing homemade mint candies recipe is sure to be a staple in your kitchen. Enjoy every moist, high protein slice — it is perfect for breakfast or as a wholesome snack any time.
Tags
Homemade Mint Candies
This Homemade Mint Candies recipe makes perfectly juicy, tender, and flavorful steak every time! Serve with potatoes and a side salad for an unforgettable dinner in under 30 minutes.
Ingredients
Main
Instructions
Make the Mint Dough
In a stand mixer bowl combine the sweetened condensed milk with the peppermint extract and vanilla extract. On low speed add about half of the powdered sugar gradually then continue adding the remainder until a soft dough forms. Scrape the bowl and mix briefly to ensure even texture.
Chill and Roll
Dust parchment with powdered sugar, knead the dough a few times then press and roll into a disk about 1 2 inch thick. Dust the top with powdered sugar to prevent sticking to the rolling pin. If it becomes warm chill for 10 minutes to firm.
Cut and Freeze
Use a 1 to 1 1 2 inch cutter or small glass to stamp circles. Place them on a parchment lined baking sheet in a single layer and freeze for 15 minutes so centers hold their shape when coated.
Melt the Chocolate
Melt chocolate in the microwave in 30 second increments stirring each time until smooth. Let it cool slightly for 3 to 4 minutes so it is warm but not scorching before dipping to avoid softening centers.
Coat and Chill
Dip each frozen center into the melted chocolate using a fork, flip to coat both sides, tap off excess and place back on the parchment. Add sprinkles while the chocolate is wet if desired. Refrigerate for 20 minutes to set then store in an airtight container.
Last Step: Please leave a rating and comment letting us know how you liked this recipe! This helps our business to thrive and continue providing free, high-quality recipes for you.
Nutrition
Did You Make This?
Leave a comment & rating below or tag
@moodcooks on social media!
Categories:
You might also like...

Cranberry Cream Cheese Pinwheels with Feta & Herbs
Buttery puff pastry rolled with tangy cream cheese, bright cranberries, salty feta and fresh herbs — effortless, elegant pinwheels perfect for gatherings or a cozy snack.

Artisan Pizza Dough — Crispy, Chewy, Bubbly Crust
A simple, reliable dough that produces a crispy exterior, chewy interior and those coveted bubbly pockets — perfect for home ovens or a pizza stone.

Italian Chicken Saltimbocca
Tender chicken breasts wrapped in prosciutto and sage, pan-seared and finished in a bright wine-and-broth sauce — a quick, elegant weeknight favorite.
Did You Make This?
Leave a comment & rating below or tag @moodcooks on social media!
Rate This Recipe
Share This Recipe
Enjoyed this recipe? Share it with friends and family, and don't forget to leave a review!
Comments (1)
This recipe looks amazing! Can't wait to try it.
Comments are stored locally in your browser. Server comments are displayed alongside your local comments.

Hi, I'm Olivia!
What's Popular

30-Minute Meals!
Join to receive our email series which contains a round-up of some of our quick and easy family favorite recipes.