
Caramel Cookie Bars

Buttery, caramel-studded bars with a tender cookie base and a gooey caramel layer — perfect for sharing, gifting, or sneaking a square with your afternoon coffee.
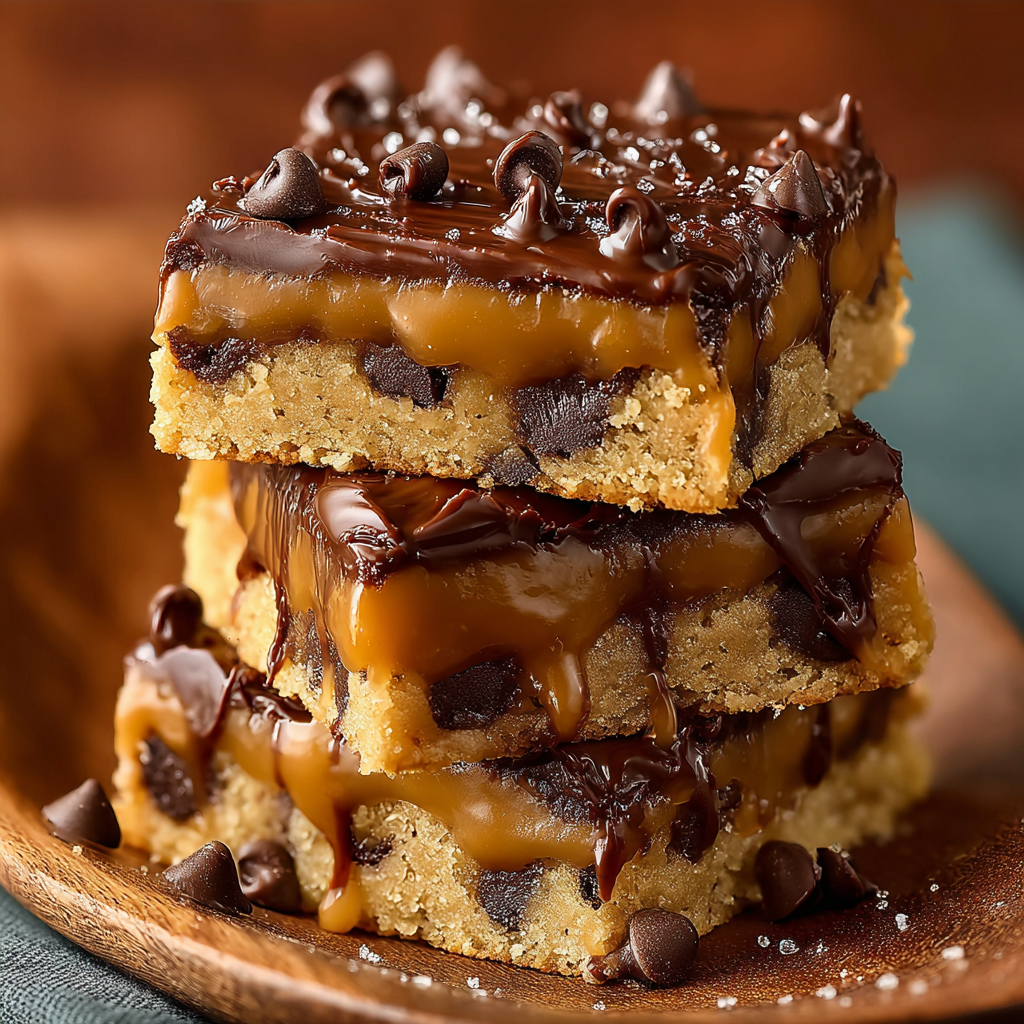
This recipe for caramel cookie bars has been a constant in my kitchen for years. I first put it together on a rainy afternoon when I wanted something comforting that used pantry staples and a bag of caramels I’d been saving for a special occasion. The result was an addictive combination of buttery cookie texture, chewy caramel, and a golden top that crisps at the edges while staying tender in the center. Every time I take these out of the oven, the house fills with a warm, sweet aroma that draws family members from other rooms — it’s the sort of baking that feels like a hug in food form.
What makes these bars special is the balance between the rich, pliable caramel middle and the simple cookie dough that holds it together without overpowering the sweetness. They are easy enough for weeknight baking yet impressive enough to bring to a potluck or to wrap as a homemade gift. I learned to press half of the dough into the pan and drizzle caramel before topping with the remainder; this layering prevents the caramel from sinking and creates distinct texture layers. Every time someone takes their first bite, I watch eyes close and a satisfied smile spread — those moments are why I keep making them.
Why You'll Love This Recipe
- Ready with minimal fuss: about 15 minutes active prep and roughly 25 minutes in the oven, which means you can bake a batch before company arrives.
- Uses pantry staples and a simple bag of soft caramels or store-bought caramel sauce, so no candy-making required.
- Layered construction gives a crisp edge and tender center — the texture contrast is addictively satisfying.
- Make-ahead friendly: the bars keep well and freeze beautifully for quick treats or last-minute entertaining.
- Crowd-pleasing and adaptable: add chocolate chips, nuts, or sea salt for different flavor profiles without changing the technique.
- Simple ingredients and techniques make this ideal for home bakers at any skill level.
Personally, I love how forgiving the dough is: it tolerates a little overmixing or slight adjustments in sugar without collapsing. My family especially appreciates slices warmed for a few seconds in the microwave with a scoop of vanilla ice cream — pure bliss.
Ingredients
- Butter: Use 1 cup (2 sticks) unsalted butter, melted and slightly cooled. Unsalted gives you better control of salt level; I like Plugrá or Kerrygold when I can splurge for a richer flavor.
- Sugar: A mix of 1 cup packed light brown sugar and 1/2 cup granulated sugar provides both sweetness and a caramel-like depth. Brown sugar adds moisture and chew.
- Vanilla: 2 teaspoons pure vanilla extract. Good vanilla brightens the whole bar — I avoid imitation and favor Nielsen-Massey when possible.
- Eggs: 2 large eggs at room temperature, added one at a time for even incorporation and lift.
- Flour: 2 1/4 cups all-purpose flour, sifted or whisked before measuring to avoid dense bars.
- Baking soda & salt: 1 teaspoon baking soda and 1/2 teaspoon fine salt lift the dough and enhance flavor contrast with the caramel.
- Caramel: One 14-ounce bag soft caramels, unwrapped, plus 2 tablespoons heavy cream to melt into a smooth pourable consistency. You can also use 1 cup store-bought caramel sauce.
- Optional additions: 1 cup semisweet chocolate chips or 1/2 cup chopped toasted pecans for texture and flavor contrast.
Instructions
Step 1 — Preheat and prepare the pan: Preheat the oven to 350°F. Line a 9x13-inch baking pan with parchment paper, leaving an overhang on two sides to lift the bars out easily. Lightly butter the exposed edges of the pan so parchment stays put. Step 2 — Melt butter and sugars: In a medium saucepan or microwave-safe bowl, melt 1 cup unsalted butter until just melted but not browned. Stir in 1 cup packed light brown sugar and 1/2 cup granulated sugar until combined and glossy; allow to cool about 5 minutes so the eggs won’t scramble when added. Step 3 — Add eggs and vanilla: Whisk in 2 large eggs, one at a time, beating each until fully incorporated. Stir in 2 teaspoons pure vanilla extract. The mixture should be smooth, slightly glossy, and pourable. Step 4 — Combine dry ingredients: Sift or whisk together 2 1/4 cups all-purpose flour, 1 teaspoon baking soda, and 1/2 teaspoon salt. Fold the dry mix into the wet ingredients until just combined — avoid overmixing to keep the bars tender. Step 5 — Layer dough and caramel: Press about half of the dough evenly into the prepared pan; it will be slightly sticky so damp fingers or a piece of parchment help. In a small saucepan, melt the 14 ounces of unwrapped soft caramels with 2 tablespoons heavy cream over low heat, stirring constantly until smooth. Drizzle or spread the warmed caramel evenly over the pressed dough. Step 6 — Top and bake: Carefully drop small spoonfuls of the remaining dough over the caramel and gently press to create a mostly even top (a few gaps are fine). Optionally sprinkle 1 cup chocolate chips or 1/2 cup toasted pecans on top. Bake at 350°F for 22–28 minutes, or until the top is golden and a toothpick inserted into the cookie layer comes out with a few moist crumbs (avoid testing through the caramel layer). Step 7 — Cool and slice: Allow bars to cool completely in the pan on a wire rack — at least 1 hour so the caramel firms. Use the parchment overhang to lift the slab from the pan and slice into 12 bars with a sharp knife, wiping the knife between cuts for clean edges.
You Must Know
- These bars store well: refrigerate in an airtight container for up to 5 days or freeze individual slices for up to 3 months.
- They are rich and caloric; a typical bar is about 300–350 calories depending on optional add-ins.
- Soft caramels melt smoothly with a little cream; if using store-bought sauce, heat gently so it spreads without running too thin.
- Let the slab cool fully before slicing to avoid gooey edges and uneven squares.
- High in dairy and gluten; they are not suitable for strict dairy-free, vegan, or gluten-free diets without substitutions.
My favorite part is how reliably these bars create moments: a neighbor pops by, and a plate of warm squares makes it feel like a party. My aunt insists on adding a sprinkle of flaky sea salt on top — it transforms the sweetness and has become my family’s signature touch.
Storage Tips
To keep these squares at their best, cool completely, then store in a single layer in an airtight container. If stacking is necessary, separate layers with parchment to prevent sticking. At room temperature they last 2–3 days; refrigeration extends freshness to about 5 days and helps keep the caramel firm. For longer storage, wrap individual bars tightly in plastic wrap and freeze in a zip-top bag for up to 3 months. Reheat frozen pieces briefly in the microwave (10–20 seconds) or at 300°F for 6–8 minutes to return them to a soft, just-baked state.

Ingredient Substitutions
If you need to adapt the ingredients, here are reliable swaps: for dairy-free, use plant-based butter and coconut cream to thin the caramels; note texture and flavor will change. To make them gluten-free, substitute a 1:1 all-purpose gluten-free flour blend and chill the dough slightly before pressing to reduce crumbling. Swap the soft caramels for equal volume of chocolate-hazelnut spread for a different twist — the assembly method remains the same, but baking time may vary slightly. When replacing brown sugar, use the same volume of white sugar plus 1 tablespoon molasses for the closest effect.
Serving Suggestions
These bars shine with a scoop of vanilla ice cream or a dollop of whipped cream. For a party, cut into small squares and serve on a platter dusted with powdered sugar and a sprinkle of chopped pecans. They pair well with strong coffee or a milky latte and make a lovely addition to a cookie tray during the holidays. For gift-giving, wrap individually in parchment and tie with twine for a charming homemade present.
Cultural Background
Layered bars with caramel have roots in American baking traditions where convenience meets indulgence — think of many 20th-century community bake sale favorites that layered cookie dough and candy. These squares borrow that approachable layering technique and the long-standing love of caramel in desserts, bridging simple home baking with candy-shop indulgence. Over time, such bars have become staples at family gatherings across the U.S., favored for their ease and rich flavor.
Seasonal Adaptations
For autumn, stir 1 teaspoon ground cinnamon and 1/4 teaspoon ground nutmeg into the dry ingredients, and fold in chopped toasted pecans. In winter, add a few tablespoons of espresso powder to the melted caramel for a mocha note. For summer, top with toasted coconut and a sprinkle of lime zest for a brighter finish. These small changes allow the same basic method to serve multiple seasons and celebrations.
Meal Prep Tips
For make-ahead entertaining, complete the bars up to the point of baking and refrigerate the unbaked slab, wrapped, for up to 24 hours. Bring to room temperature before baking and add a few extra minutes to the bake time if chilled. Bake, cool, then slice and store in the refrigerator or freeze single portions for grab-and-go treats. Label frozen portions with date and reheating instructions for easy future use.
These caramel cookie bars are one of those recipes that feel both nostalgic and reliable. Whether you’re making a quick batch for a Tuesday afternoon or prepping a tray for a family gathering, the straightforward method and crowd-pleasing flavor make them a go-to. Try them once and you’ll understand why they keep making repeat appearances in my kitchen — and I hope they do in yours, too.
Pro Tips
Press half the dough into the pan while slightly dampening your fingers to avoid sticking.
Melt caramels slowly over low heat with 2 tablespoons cream to create a glossy, pourable layer.
Cool the pan completely before slicing; chilling for 30 minutes yields sharper cuts.
Use parchment overhang to lift the bars cleanly from the pan for easier slicing and storage.
This nourishing caramel cookie bars recipe is sure to be a staple in your kitchen. Enjoy every moist, high protein slice — it is perfect for breakfast or as a wholesome snack any time.
FAQs about Recipes
How do I get clean slices without caramel oozing?
Yes. Let the slab cool completely so the caramel firms; then chill for 30 minutes for cleaner slices.
Can I use jarred caramel sauce instead of candy caramels?
Replace the soft caramels with 1 cup of high-quality store-bought caramel sauce, heated gently before spreading.
Tags
Caramel Cookie Bars
This Caramel Cookie Bars recipe makes perfectly juicy, tender, and flavorful steak every time! Serve with potatoes and a side salad for an unforgettable dinner in under 30 minutes.
Ingredients
Cookie Base
Caramel Layer & Extras
Instructions
1. Preheat and prep your baking pan
Preheat oven to 350°F and line a 9x13-inch pan with parchment, leaving an overhang for easy removal; lightly butter the exposed pan edges.
2. Melt butter, then mix with sugar
Melt 1 cup butter, stir in 1 cup packed brown sugar and 1/2 cup granulated sugar until combined; cool slightly before adding eggs.
3. Add eggs one by one, and stir in vanilla
Whisk in 2 eggs one at a time, then stir in 2 teaspoons vanilla until the mixture is smooth and glossy.
4. Sift in flour and baking soda, mix until combined
Fold together 2 1/4 cups flour, 1 teaspoon baking soda, and 1/2 teaspoon salt into the wet mix until just combined; avoid overmixing.
5. Press half the mixture into the pan, drizzle with caramel
Press half the dough into the pan, melt 14 oz caramels with 2 tablespoons heavy cream over low heat and drizzle evenly over the pressed dough.
6. Cover with remaining dough and bake until golden
Dot remaining dough over the caramel, gently press to even the top, optionally sprinkle chips or nuts, and bake 22–28 minutes until golden; cool completely before slicing.
Last Step: Please leave a rating and comment letting us know how you liked this recipe! This helps our business to thrive and continue providing free, high-quality recipes for you.
Nutrition
Did You Make This?
Leave a comment & rating below or tag
@moodcooks on social media!
Categories:
You might also like...
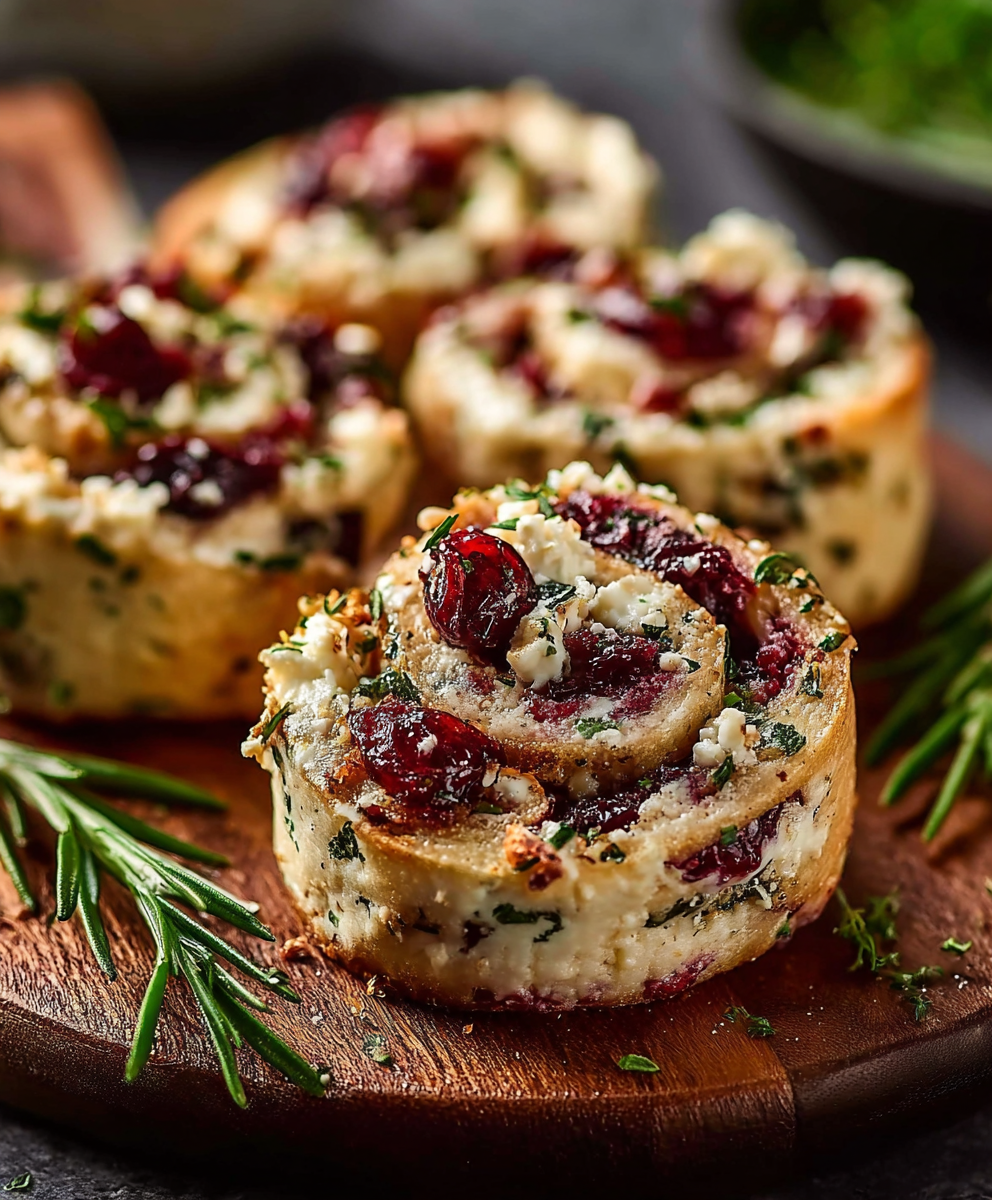
Cranberry Cream Cheese Pinwheels with Feta & Herbs
Buttery puff pastry rolled with tangy cream cheese, bright cranberries, salty feta and fresh herbs — effortless, elegant pinwheels perfect for gatherings or a cozy snack.
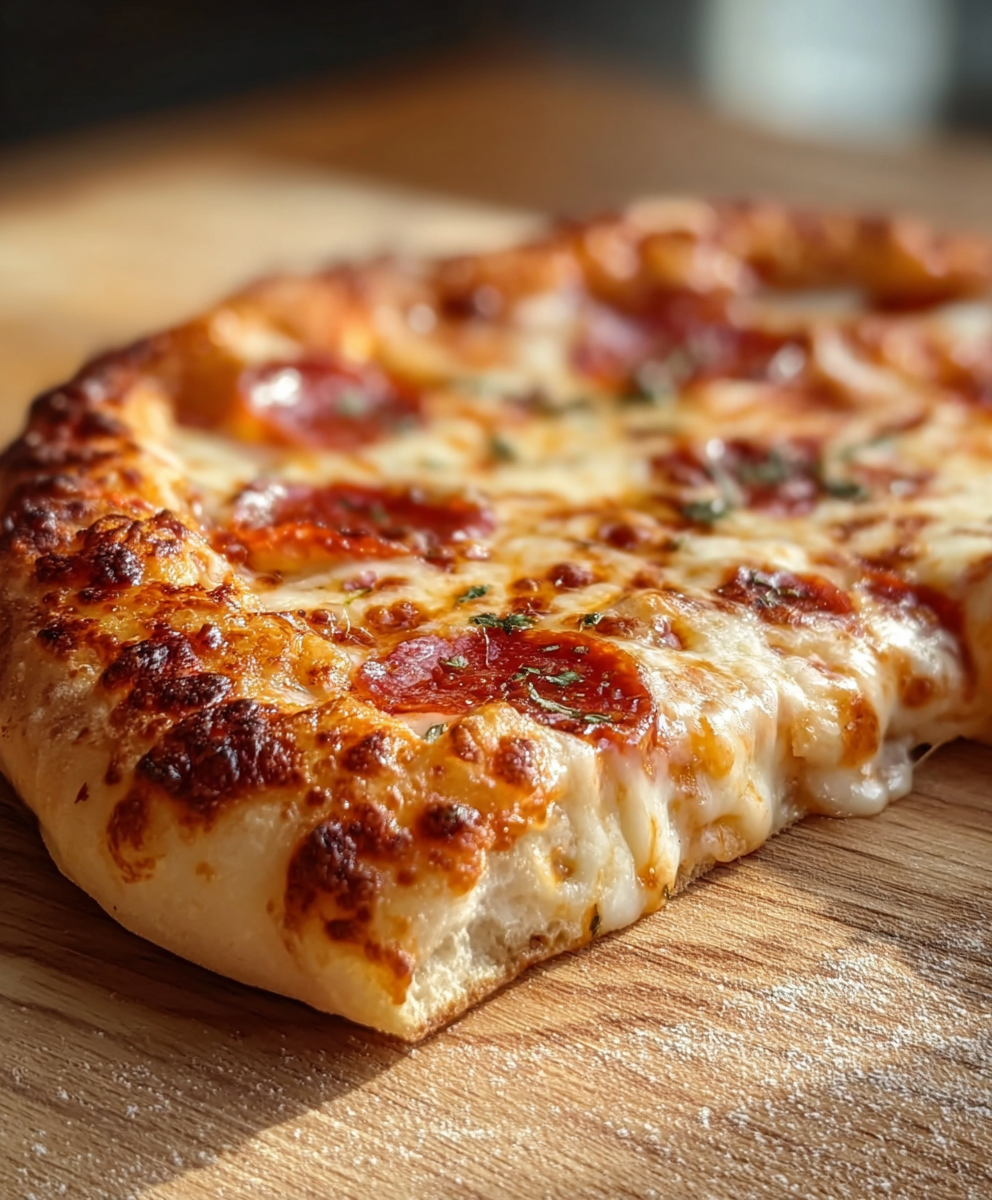
Artisan Pizza Dough — Crispy, Chewy, Bubbly Crust
A simple, reliable dough that produces a crispy exterior, chewy interior and those coveted bubbly pockets — perfect for home ovens or a pizza stone.
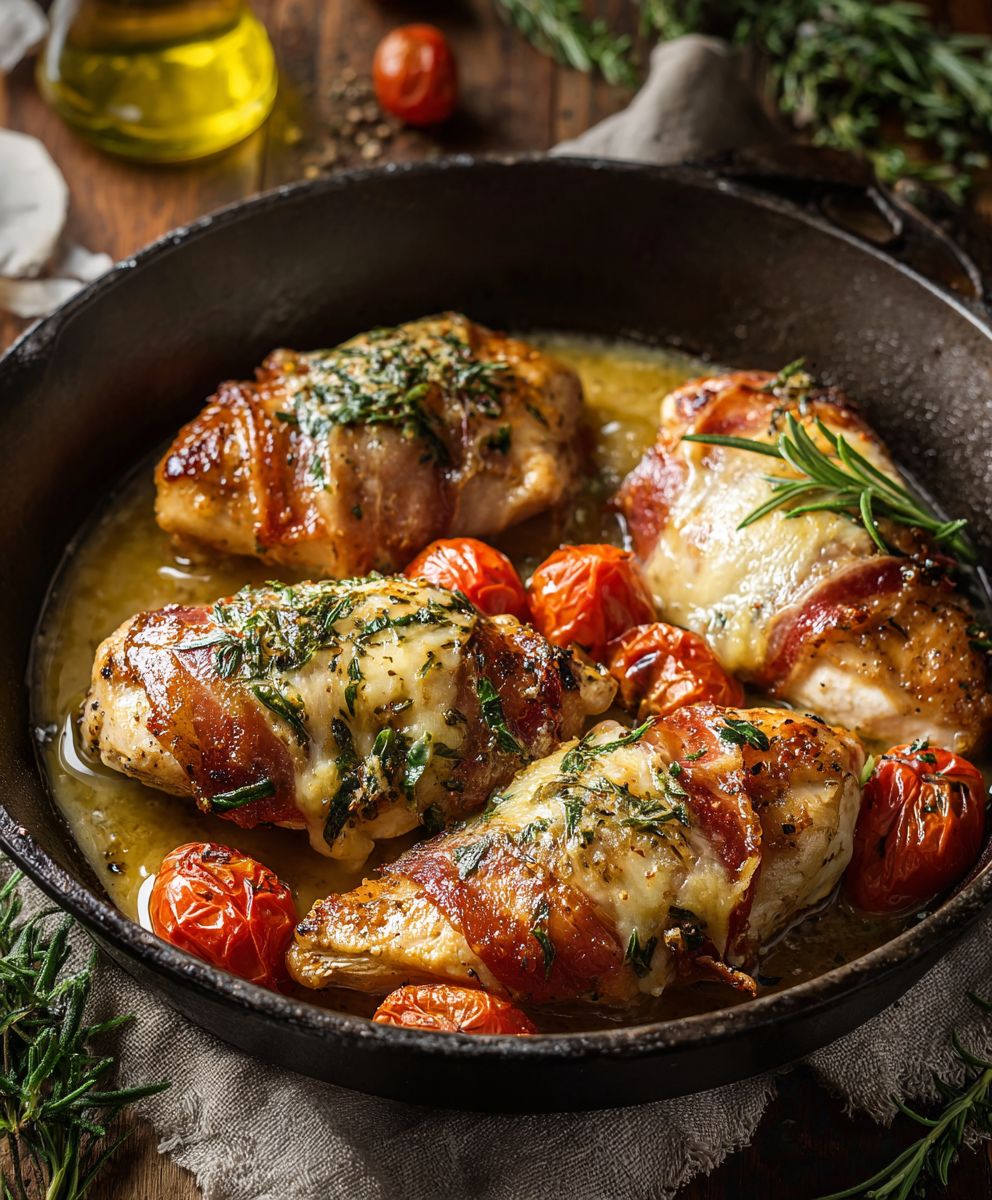
Italian Chicken Saltimbocca
Tender chicken breasts wrapped in prosciutto and sage, pan-seared and finished in a bright wine-and-broth sauce — a quick, elegant weeknight favorite.
Did You Make This?
Leave a comment & rating below or tag @moodcooks on social media!
Rate This Recipe
Share This Recipe
Enjoyed this recipe? Share it with friends and family, and don't forget to leave a review!
Comments (1)
This recipe looks amazing! Can't wait to try it.
Comments are stored locally in your browser. Server comments are displayed alongside your local comments.

Hi, I'm Olivia!
What's Popular
30-Minute Meals!
Join to receive our email series which contains a round-up of some of our quick and easy family favorite recipes.